
9 Intro to CI/CD with Github Actions
What you’ll have learned by the end of the chapter: very basic knowledge of Github Actions, but enough to run your RAP in the cloud.
9.1 Introduction
We are almost at the end; actually, we could have stopped at the end of the previous chapter. We have reached our goal; we are able to run pipeline in a 100% reproducible way. However, this requires some manual steps. And maybe that’s not a problem; if your image is done, and users only need to pull it and run the container, that’s not really a big problem. But you should keep in mind that manual steps don’t scale. Let’s imagine another context; let’s suppose that you are part of a company and that you are part of a team that needs to quickly ship products to clients. Maybe several people contribute to the product using an internal version control solution (like a Gitlab instance that is deployed on the premises of your company). Maybe you even need to work on several products in the same day; you (and your teammates) should only be focusing writing code (and Dockerfiles)… your time and resources cannot get clogged by building images (which depending on what you’re working on, can take quite some time). So ideally, we would want to automate this step. That is what we are going to learn in this chapter.
This chapter will introduce you to the basic ideas of CI/CD (Continuous Integration and Continuous Deployment/Delivery) and DevOps with Github Actions. Because we’re using Git to trigger all the events and automate the whole pipeline, this can also be referred to as GitOps. What’s Dev(Git)Ops? I think that the Atlassian page on DevOps makes a good job of explaining it. The bottom line is that DevOps makes it easy for developers to focus on coding, and makes it easy for them to ship data products. The core IT team provides the required infrastructure and tools to make this possible. GitOps is a variant of DevOps where the definition of the infrastructure is versioned, and can be changed by editing simple text files. Through events, such as pushing to the repository, new images can be built, or containers executed. Data products can then also be redeployed automatically. All the steps we’ve been doing manually, with one simple push! It’s also possible, in the context of package development, to execute unit tests when code gets pushed to repo, or get documentation and vignettes compiled. This also means that you could be developing on a very thin client with only a text editor and git installed. Pushing to Github would then execute everything needed to have a package ready for sharing.
So our goal here is, in short, to do exactly the same as what we have been doing on our computer (so build an image, run a container, and get back 3 plots), but on Github.
9.2 Getting your repo ready for Github Actions
You should see an “Actions” tab on top of any Github repo:

This will open a new view where you can select a lot of available, ready to use actions. Shop around for a bit, and choose the right one (depending on what you want to do). You should know that there is a very nice repository with many actions for R. Once you’re done choosing an action, a new view in which you can edit a file will open. This file will have the name of the chosen action, and have the .yml extension. This file will be automatically added to your repository, in the following path: .github/workflows.
Let’s take a look at such a workflow file:
name: Hello world
on: [push]
jobs:
  say-hello:
    runs-on: ubuntu-latest
    steps:
      - run: echo "Hello from Github Actions!"
      - run: echo "This command is running from an Ubuntu VM each time you push."
Let’s study this workflow definition line by line:
name: Hello worldSimply gives a name to the workflow.
on: [push]When should this workflow be triggered? Here, whenever something gets pushed.
jobs:What is the actual things that should happen? This defines a list of actions.
say-hello:This defines the say-hello job.
runs-on: ubuntu-latestThis job should run on an Ubuntu VM. You can also run jobs on Windows or macOS VMs, but this uses more compute minutes than a Linux VM (you have 2000 compute minutes for free per month).
steps:What are the different steps of the job?
- run: echo "Hello from Github Actions!"First, run the command echo "Hello from Github Actions!". This commands runs inside the VM. Then, run this next command:
- run: echo "This command is running from an Ubuntu VM each time you push."Let’s push, and see what happens on github.com:
If we take a look at the commit we just pushed, we see this yellow dot next to the commit name. This means that an action is running. We can then take a look at the output of the job, and see that our commands, defined with the run statements in the workflow file, succeeded and echoed what we asked them.
So, the next step is running our Docker image and getting back our plots. This next example can be found in this repository.
This is what our workflow file looks like:
name: Reproducible pipeline

on:
  push:
    branches: [ "main" ]
  pull_request:
    branches: [ "main" ]

jobs:

  build:

    runs-on: ubuntu-latest

    steps:
    - uses: actions/checkout@v3
    - name: Build the Docker image
      run: docker build -t my-image-name .
    - name: Docker Run Action
      run: docker run --rm --name my_pipeline_container -v /github/workspace/fig/:/home/graphs/:rw my-image-name
    - uses: actions/upload-artifact@v3
      with:
        name: my-figures
        path: /github/workspace/fig/
For now, let’s focus on the run statements, because these should be familiar:
run: docker build -t my-image-name .and:
run: docker run --rm --name my_pipeline_container -v /github/workspace/fig/:/home/graphs/:rw my-image-nameThe only new thing here, is that the path has been changed to /github/workspace/. This is the home directory of your repository, so to speak. Now there’s the uses keyword that’s new:
uses: actions/checkout@v3This action checkouts your repository inside the VM, so the files in the repo are available inside the VM. Then, there’s this action here:
- uses: actions/upload-artifact@v3
  with:
    name: my-figures
    path: /github/workspace/fig/
This action takes what’s inside /github/workspace/fig/ (which will be the output of our pipeline) and makes the contents available as so-called “artifacts”. Artifacts are the outputs of your workflow. In our case, as stated, the output of the pipeline. So let’s run this by pushing a change, and let’s take a look at these artifacts!
As you can see from the video above, a zip file is now available and can be downloaded. This zip contains our plots! It is thus possible to rerun our workflow in the cloud. This has the advantage that we can now focus on simply changing the code, and not have to bother with boring manual steps. For example, let’s change this target in the _targets.R file:
tar_target(
    commune_data,
    clean_unemp(unemp_data,
                place_name_of_interest = c("Luxembourg", "Dippach",
                                           "Wiltz", "Esch/Alzette",
                                           "Mersch", "Dudelange"),
                col_of_interest = active_population)
)
I’ve added “Dudelange” to the list of communes to plot. Let me push this change to the repo now, and let’s take a look at the artifacts. The video below summarises the process:
As you can see in the video, the _targets.R script was changed, and the changes pushed to Github. This triggered the action we’ve defined before. The plots (artifacts) get refreshed, and we can download them. We see then that Dudelange was added in the communes.png plot!
It is also possible to “deploy” the plots directly to another branch, and do much, much more. I just wanted to give you a little taste of Github Actions (and more generally GitOps). The possibilities are virtually limitless, and I still can’t get over the fact that Github Actions is free (well, up to 2000 compute minutes and 500MB storage per month).
9.3 Building a Docker image and pushing it to a registry
It is also possible to build a Docker image and have it made available on an image registry. You can see how this works on this repository. This images can then be used as a base for other RAPs, as in this repository. Why do this? Well because of “separation of concerns”. You could have a repository which builds in image containing your development environment: this could be an image with a specific version of R and R packages. And then have as many repositories as projects that run RAPs using that development environment image as a basis. Simply add the project-specific packages that you need for each project.
9.4 Running a pipeline straight from Github Actions
Using Docker on Github Actions has the advantage that you can use the same image to develop locally on your computer, and then also on CI. However, you could also run the pipeline straight from a Github Actions runner, but it’ll take some effort to set up the environment on CI. Take a look at the example from this repository.
The yaml file used in this action (which you can find here) was generated by running targets::tar_github_actions() and was then modified further, mostly to add the required development libraries to compile the needed R packages (under the Install Linux system dependencies step).
This action takes advantage of the included Github Actions cache to backup the targets from the pipeline, so they can also get skipped with subsequent runs:
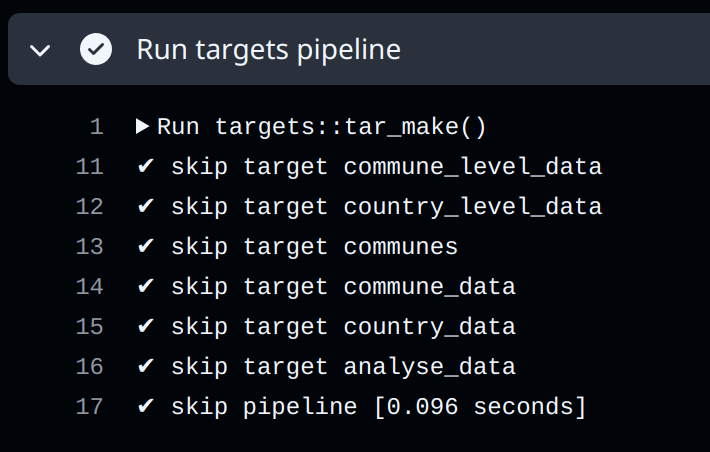
This can also be achieved with Docker by mounting volumes, but requires more manual setup.
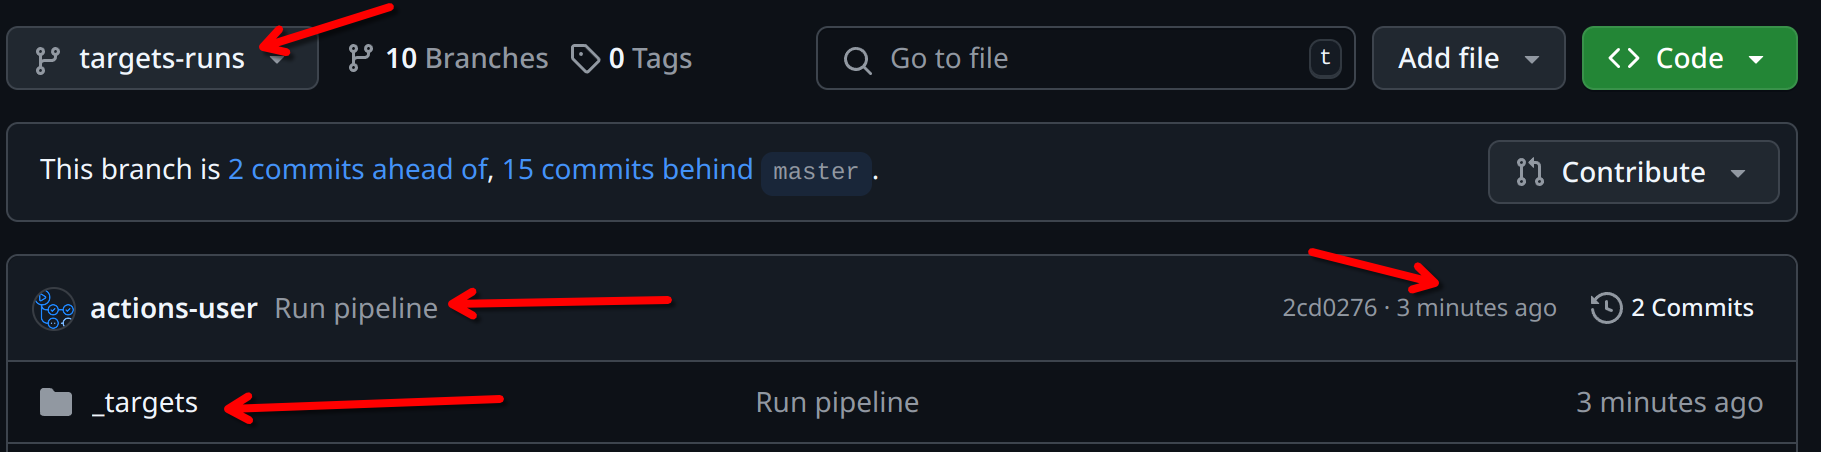
Another difference with Docker is that the outputs are not saved as an artifact, but instead get pushed to the targets-runs branch:
9.5 Running unit tests on Github Actions
Setting up your project as a package (or at least, the parts of your project that can be reused for others) as a package also has the advantage that it becomes very easy to run unit tests on CI. See for example the {myPackage} package that we developed together, in particular this file. This action runs on each push and pull request on Windows, Ubuntu and macOS:
on:
  push:
    branches: [ "main" ]
  pull_request:
    branches: [ "main" ]

jobs:
  rcmdcheck:
    runs-on: ${{ matrix.os }}
    strategy:
      matrix:
        os: [ubuntu-latest, windows-latest, macos-latest]
Several steps are executed, all using pre-defined actions from the r-lib project:
    steps:
    - uses: actions/checkout@v4
    - uses: r-lib/actions/setup-r@v2
    - uses: r-lib/actions/setup-r-dependencies@v2
      with:
        extra-packages: any::rcmdcheck
        needs: check
    - uses: r-lib/actions/check-r-package@v2
An action such as r-lib/actions/setup-r@v2 will install R on any of the supported operating systems without requiring any configuration from you. If you didn’t use such an action, you would need to define three separate actions: one that would be executed on Windows, on Ubuntu and on macOS. Each of these operating-specific actions would install R in their operating-specific way.
Check out the workflow results to see how the package could be improved here.
9.6 Further reading
- http://haines-lab.com/post/2022-01-23-automating-computational-reproducibility-with-r-using-renv-docker-and-github-actions/
- https://orchid00.github.io/actions_sandbox/
- https://www.petefreitag.com/item/903.cfm
- https://dev.to/mihinduranasinghe/using-docker-containers-in-jobs-github-actions-3eof